Fortigate Configuration & Practical Series — — Part 2


Managing the Administrator User Accounts on Fortigate
Note: For this series I am using Fortigate 5.6
Alright, now that our firewall is up and running, let’s dive into the real fun stuff — managing users and their roles. This isn’t just about keeping things tidy; it’s about cranking up our security to the max. We’re playing by the ISMS rules here, specifically the ‘least privilege’ one. So, let’s get our hands dirty with today’s task: setting things up just right.
Here’s your easy-peasy step-by-step guide:
Start Your Engines: Fire up that Fortigate Firewall from the VMware Workstation. (Remember how we did that in the first part? Yeah, just like that.)
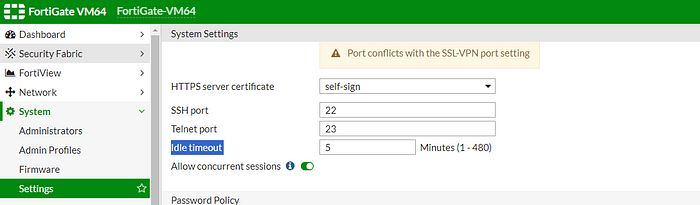
Head to HQ: Once you’re in, make a beeline for ‘Settings’ under the ‘Systems’ tab.

3. New Kid on the Block: Hit ‘Create New’ to bring a fresh user into the world.
4. Why New is Good: We’re not sticking with the admin username. Why? It’s like a magnet for troublemakers (aka hackers). So, we’re making a new user to be the network’s superhero.
5. The Power of Privilege: This new user isn’t just anyone — they’re getting the full suite of powers. But remember, with great power comes great responsibility. This is a role for the network’s top dog only.
6. Personal Touch: Now, set this up with your own secret sauce — I mean, credentials. Make it unique, make it you
7. Click on create new to create a new user.

8. The reason behind creating this new user is that admin username is vulnerable to attacks so we are creating a new user through which we can manage the whole network.
9. We will be assigning all privileges to this new user. This role should be assign only to network Administrators.
10. You can configure this step by the credentials of your own choice.
11. Spying on Admin Powers: Want to see the superpowers your admins have? Just click on the pencil icon on the right. It’s like having x-ray vision for admin rights!
12. A Quick Peek: This nifty feature lets you check out the privileges each admin holds. It’s like having a sneak peek into their toolkit.
13. Choosing the Captain: For my setup, I’m picking ‘super admin’. Why? Because they’ve got all the privileges. Think of it as choosing the captain of your ship.
14. Out With the Old: Now that we have our shiny new user, it’s time to bid farewell to the old admin. But don’t rush; let’s do one more thing first.
15. More Time, More Power: Ever get annoyed by those ‘time’s up’ logouts? The default setting logs you out in 5 minutes, but we’re going for the long haul. Let’s bump it up to 100 minutes. Because nobody likes getting cut off mid-action, right?
12. New Sheriff in Town: Time to switch! Log out from the old admin and log into your newly created admin account. Just a heads-up: be careful with those capital letters in your username and password. They’re crucial for access!
13. Clean House: Once you’re in with your new admin, it’s time to say goodbye to the old one. Just head to ‘Administrators’ under the ‘System’ tab, and you can remove the old admin user. Neat and tidy!
14. Setting Up Read-Only: Now, let’s set up a read-only policy. In many workplaces, some folks only need to read, not change things. We’re about to make that happen.

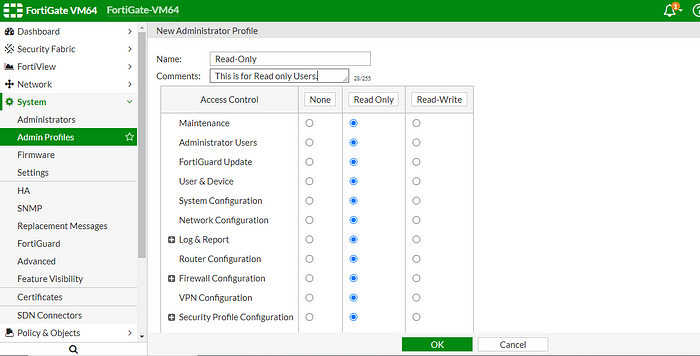
15. Creating the Profile: Dive into the ‘Admin Profiles’ under the ‘System’ Tab. Hit ‘Create New’ to start shaping this profile.
16. Naming the Beast: I’m calling this new profile ‘Read Only.’ Simple and straight to the point.
17. Tweak the Settings: Click on your ‘Read Only’ profile and adjust all Features to ‘Read Only’ mode. It’s like putting guardrails on your network.
18. Lock It In: Click ‘OK’ to save these new settings. You’re setting the rules of the game now!
19. New Player in the Game: Time to create another new user, but this time, assign them the ‘Read Only’ role. This user is like your network’s librarian — they can see everything but can’t rearrange the books.
20. Seal the Deal: Save your settings, and then log into this new read-only account.
21. The Magic Trick: Here’s where the magic happens. You can look around, click things, but notice something? The ‘Save’ button is gone! It’s like having a view-only pass to a museum. You can see everything, but you can’t touch. Magic, indeed!”
“And there you have it! In this easy-to-follow guide, we’ve journeyed through the world of creating new users and assigning them roles based on the principle of least privilege. It’s like giving everyone the right-sized key to the parts of your network castle they need to visit.
But wait, there’s more! In our next exciting installment, we’ll dive even deeper into the awesome features of the Fortigate Firewall. It’s like exploring hidden rooms in a tech fortress. So, stay tuned for more!
Did you enjoy the adventure? Found it helpful? Then don’t be shy — give it a round of applause with a clap (or three 👏👏👏)! Your feedback is the cheer that keeps the tech magic alive!”